• Facebook
  • Instagram
  • Pinterest
  • Twitter
  • YouTube

Tools2Tiaras

Take The Wave In Your Gown

  • Home
  • Gift Guide
    • Holiday Gift Guides
    • Shopping
      • Luxury
  • Beauty & Fashion
    • Beauty
    • Fashion
    • Over 40
    • Over 50
  • Family
    • Baby/Toddler
    • Teens
    • College Students
    • Wedding
    • Empty Nest
  • Food
    • Adult Cocktails
    • Baking
    • Entertaining
  • Home & Living
    • Business
    • Crafts & DIY
    • Entertainment
    • Fitness
    • Health
    • Living
    • Movies & TV
      • Movies
    • Outdoors
    • Pets
  • Travel
    • Spa
    • The Compass Girls Magazine
  • Men’s Lifestyle
    • Auto
    • Sports
    • Tech
    • Men’s DIY
    • Men’s Fashion

How To Build A Step Stool For Your Toddler – Easy #DIY

January 21, 2014 Justin Beam 28 Comments

So my 3 yr old can’t reach the sink. Seems like an easy problem to fix, most people would just head out to their local big box store and pick up a step stool. With my wife it just wasn’t quite that easy.  Our journey began at Target where I was dragged kicking & screaming through the entire store. Our journey continued through every other store within a 10 mile radius where every stool we came across just didn’t work for us. So I decided to gather up some scrap wood I had lying around and build a step stool that would work for us.

stool collage

Step 1
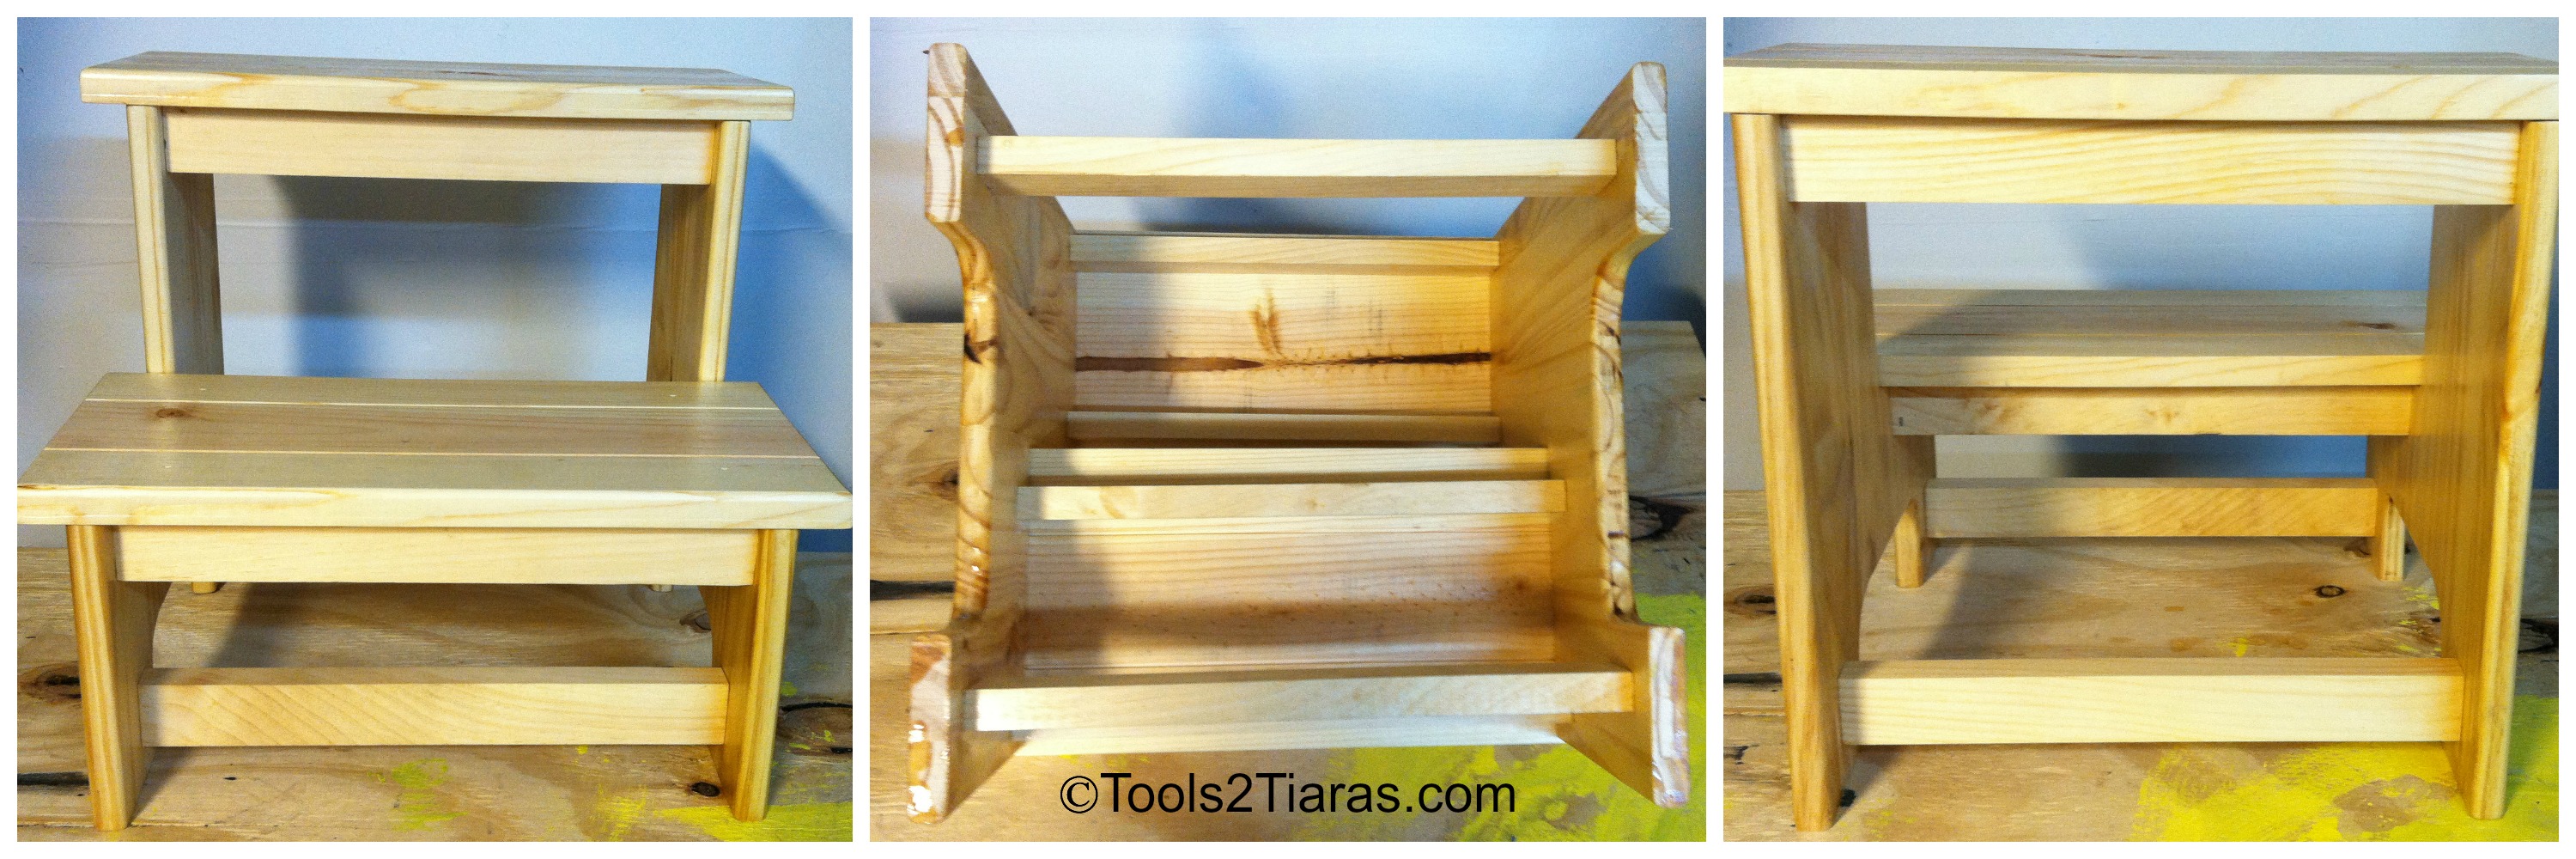
Cut the side’s of your stool. I began by cutting two pieces 14” X 14”. Then notched out for my steps, making each step 7” high. Cut out a rounded section at the bottom of each side to create legs.

Step 2
Cut the treads for each step. I chose to have a 1” overhang on the sides of each step and a ¼” overhang in the front.  I cut my steps 7 ¼” X 16”

Step 3
Cut stabilizers for each step & to strengthen the stool. I used 1” X 2” pieces 12 ¾” long. I cut 6 of these. 2 will help support each tread & 2 will be attached 1” from the bottom of the front and rear legs.

Step 4
Cut small treads in the steps using a Tablesaw or a Circular Saw about 1/8” deep.

Step 5
Route the edges of the legs, the risers & the front/sides of each step. I used a ¼” round-over bit to accomplish the look I desired.

Step 6
Attach the side’s to the tread supports. Quick Tip: Use wood glue and a finish nail gun. I placed my front and rear supports for each tread 1” in from the edges. After attaching the 4 tread supports attach the lower supports 1” from the bottom of the stools legs on center.

Step 7
Attach your treads making sure the overhang on each side is equal again using wood glue and nail gun. Let the stool sit so the glue can dry properly.

Step 8
Finish with stain or polyurethane. I left the wood as natural as possible by only applying one coat of polyurethane. You could paint or stain as desired.

finished-stool


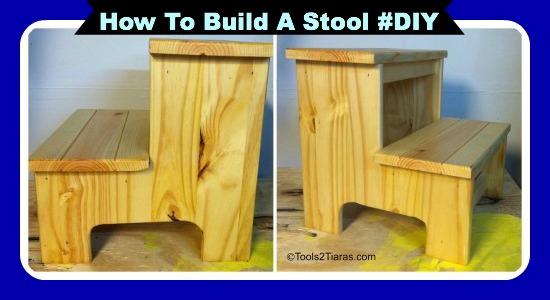
We spent quite a bit of time looking for something to buy that I should have just made out of scrap lumber from the start. The best part was it didn’t cost me anything except time! We are very happy with our step stool and will use it for many years to come. It’s a very simple design & is the exact size/style that we wanted. Not to mention anyone can make one if you just take the time to try!

Have you ever made furniture for your home? What was it?


Related Posts Plugin for WordPress, Blogger...

Crafts & DIY build an easy stool, DIY, how to build a stool, lumber, nail gun, polyurethane, scrap, skillsaw, step stool, stool, tablesaw, Target, wood glue

About Justin Beam

Country born and raised transplanted to the big city. Dedicated husband and father to a mini me. Family comedian, movie fanatic. Corporate sales manager turn social media junkie. Jack of all trades, tool guru addicted to getting dirty in the garage and always looking for a new project. Bazinga!

Comments

  1. Linda Kinsman says

    January 22, 2014 at 10:11 am

    Great step by step guide Justin!

    Reply
    • Justin Beam says

      January 29, 2014 at 9:48 pm

      Thank you!

      Reply
  2. Rajean Blomquist says

    January 22, 2014 at 11:00 am

    Super cute and looks sturdy. When I was in 7the grade I learned how to macramé and I made these hanging tables, kind of like shelves. Everyone got them as gifts that Christmas.

    Reply
    • Justin Beam says

      January 29, 2014 at 9:50 pm

      Sounds cool! I would like to have a few!

      Reply
  3. tara pittman says

    January 22, 2014 at 12:00 pm

    I once made a coat rack for my daughter. This was years ago but it was great for her to hang dress up clothes on it.

    Reply
    • Justin Beam says

      January 29, 2014 at 9:53 pm

      Oh that’s a good idea, my son would love a coat rack!

      Reply
  4. Jamie says

    January 22, 2014 at 12:48 pm

    Adorable – pinned it!! I think I’ll make one of these to get to the candy we have to hide from our son!! 🙂

    Reply
    • Justin Beam says

      January 29, 2014 at 9:53 pm

      LOL! Feel free to send some candy my way too!

      Reply
  5. Melinda@LookWhatMomFound...andDadtoo says

    January 22, 2014 at 1:29 pm

    aren’t you handy! painted in a bright color that would be really pretty in a bathroom

    Reply
    • Justin Beam says

      January 29, 2014 at 9:55 pm

      I try to be! Sometimes it works out other times not so much 🙂

      Reply
  6. Theresa says

    January 22, 2014 at 2:22 pm

    Hush up! This is too cute! Pinning it now!

    Reply
  7. Mary H. says

    January 22, 2014 at 3:59 pm

    Great tutorial! Love it.

    Reply
  8. Michelle says

    January 24, 2014 at 12:03 pm

    Love this! Sometimes we forget how easy it is to put something like this together and opt to purchase instead.

    Reply
  9. HilLesha says

    January 24, 2014 at 2:41 pm

    I have never attempted at making furniture, but I have a brother and sister that are really good at this! My sister-in-law is pretty good at this, too. Me, on the other hand, just not skillful when it comes to things like this. ~lol~

    Reply
  10. Donna says

    January 24, 2014 at 3:35 pm

    I’m not sure if I could build it or not, but that is a great step-by-step tutorial! And, no, I’ve never tried to build a piece of furniture before. I have refinished, painted, and/or stained furniture, though 🙂

    Reply
  11. Jennifer @ My Sweet Sanity says

    January 24, 2014 at 4:40 pm

    Great instructions and step stool. So much sturdier looking than those plastic ones.

    Reply
  12. Digna D. says

    January 24, 2014 at 5:41 pm

    Great DIY tutorial! I am quit handy with staining, drilling and using other tools. Other than drilling or wood burning I don’t work do too much with wood. I think anyone with a tablesaw & circular saw can surely put this together in no time.

    Reply
  13. Ashley - Embracing Beauty says

    January 24, 2014 at 5:51 pm

    You make that look so very easy!! I’d love to have one so maybe I’ll give it a try.

    Reply
  14. Sara Phillips says

    January 24, 2014 at 6:18 pm

    That is beautiful! I have about 5 step stools around the house – but for MY use! 😉

    Reply
  15. Kim @ What's That Smell? says

    January 24, 2014 at 8:45 pm

    Wow, that turned out great!

    Reply
  16. Melissa says

    January 24, 2014 at 11:05 pm

    Wow, this is beautiful!

    Reply
  17. Shell Feis says

    January 24, 2014 at 11:11 pm

    I love it! I looked EVERYWHERE for something similar for my son but had to settle for something else- I never thought to make it!

    Reply
  18. Billie @ Rowell Reviews says

    January 24, 2014 at 11:13 pm

    This is gorgeous and it will mean a bunch that you made it yourself.

    Reply
  19. Julie says

    January 25, 2014 at 12:26 am

    This is so great! My kids would love it.

    Reply
  20. kasey@allthingsmamma says

    January 25, 2014 at 1:12 am

    That’s so handy!!

    Reply
  21. Jen says

    January 25, 2014 at 10:08 pm

    This made me think of my Grandfather, he loved to make things like this. I’ve never had the talent, but woodworking was his passion.

    Reply
    • Justin Beam says

      January 29, 2014 at 9:57 pm

      There is just something about working in the shop, so relaxing!

      Reply
  22. Justin Beam says

    January 29, 2014 at 9:58 pm

    Thanks Everyone! Hope it gave you some ideas!

    Reply

Leave a Reply Cancel reply

Your email address will not be published. Required fields are marked *

Instagram

rachelferrucci


You’ll find a replica David in the square but goin
You’ll find a replica David in the square but going to Accademia Gallery in Florence and seeing this breathtaking statue by Michelangelo is 100% worth it, whether you like art or not. His right leg has a tree stump which balances the entire statue. 

#travelinfluencer #florenceitaly🇮🇹 #artlovers #michelangelo


My souvenir from Paris. You asked what it was, her
My souvenir from Paris. You asked what it was, here you go. 

#Dior


Our first day in #Florence.
@hoteltorreguelfa was

Our first day in #Florence.
@hoteltorreguelfa was exquisite and the perfect location. 
First thing- mangia and second - gelato
=heaven


Shopping day in Paris!

#Paris #gallerieslafayett
Shopping day in Paris! 

#Paris #gallerieslafayette


Follow on Instagram


© Copyright 2025 Tools 2 Tiaras · All Rights Reserved · · All Logos & Trademark Belongs To Their Respective Owners·

  • Home
  • About Us
  • Contact/PR/Media
  • Privacy Policy
  • Cookie Policy
We use cookies on our website to give you the most relevant experience by remembering your preferences and repeat visits. By clicking “Accept”, you consent to the use of ALL the cookies.
.
SettingsAccept
Privacy & Cookies Policy

Privacy Overview

This website uses cookies to improve your experience while you navigate through the website. Out of these, the cookies that are categorized as necessary are stored on your browser as they are essential for the working of basic functionalities of the website. We also use third-party cookies that help us analyze and understand how you use this website. These cookies will be stored in your browser only with your consent. You also have the option to opt-out of these cookies. But opting out of some of these cookies may affect your browsing experience.
Necessary
Always Enabled
Necessary cookies are absolutely essential for the website to function properly. This category only includes cookies that ensures basic functionalities and security features of the website. These cookies do not store any personal information.
Non-necessary
Any cookies that may not be particularly necessary for the website to function and is used specifically to collect user personal data via analytics, ads, other embedded contents are termed as non-necessary cookies. It is mandatory to procure user consent prior to running these cookies on your website.
SAVE & ACCEPT