If you’ve got a pile of broken tools in the shed, you’re sitting on a goldmine of potential garden art. With a bit of basic welding and some imagination, those worn-out rakes, shovels, and wrenches can become quirky, functional pieces that give your outdoor space real character.
Why Broken Tools Make Great Garden Art
Old tools are already designed to live outdoors, so they’re tough, weather-resistant, and full of history. Their patina — the rust, scratches, and dings — adds ready‑made texture and personality you’d pay extra for in a store-bought sculpture.
Instead of sending them to the landfill, you can:
- Create conversation pieces that reflect your values around reuse and sustainability.
- Add structure and height where plants die back in winter, so the garden still looks interesting.
- Build useful items — like trellises or hose guides — that quietly do their job and look cool doing it.
For many people, there’s also something grounding about taking an object that once did hard work and giving it a second life.
Getting Ready: Tools, Safety, and Materials
You don’t need a full fabrication shop to start welding garden art, but you do need a few basics. A small MIG welder is often recommended for hobby projects because it’s relatively easy to learn and works well with common steel scrap.
Here’s a starter checklist:
- Welder: A MIG welder with flux-core wire is enough for most light garden sculptures and tool-based projects.
- Angle grinder: For cleaning rust off weld areas and shaping metal; it also lets you add surface texture if you want a more rugged look.
- Clamps or a vise: To hold pieces in place while you tack them together.
- PPE: Welding helmet with proper shade lens, gloves, cotton clothing, and safety glasses for grinding.
In all of these projects, clear vision and eye safety matter just as much as creativity; using a well-matched welding lens shade helps you see the weld puddle clearly and reduces fatigue so you can focus on clean, secure joints. Companies like Ridge Products Welding offer dedicated welding lenses, helmets, and equipment that make it easier for hobby welders to upgrade their helmets and stay comfortable and protected throughout longer projects.
Simple Project Ideas to Get You Started
Begin with small, stable, and forgiving projects. The goal is to practice joining metal, not to create a museum piece on day one.
1. Garden Tool Totems
Totems are vertical stacks of objects that add height and personality to beds and borders. They’re perfect for broken tools because the handles, heads, and odd parts all stack in interesting ways.
Basic approach:
- Start with a sturdy metal stake, pipe, or piece of rebar as your central spine.
- Slide on tool heads — like hoes, trowels, and wrenches — arranging them at different angles so they “spiral” up the shaft.
- Tack weld each piece in place, then go back and add stronger welds once you like the layout.
You can finish with a fun topper: a gear “sun,” a circular saw blade “halo,” or a cluster of bolts welded into a flower.
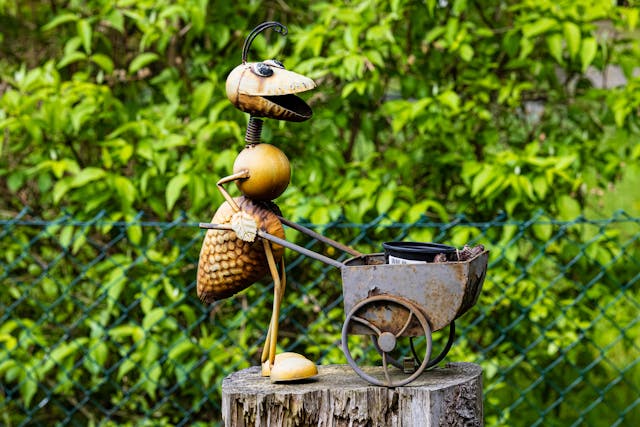
2. Metal Birds and Critters from Hand Tools
Birds, bugs, and small animals are popular garden art motifs, and broken tools practically volunteer to become them.
Some ideas:
- Pliers or tongs as beaks, garden shears as wings, and spoons as tails.
- Old rake heads as porcupine backs or sunburst tails.
- Wrenches and spanners as legs or necks.
Sketch a simple silhouette on cardboard first, then lay your metal pieces over it until the proportions feel right. Once you’re happy, tack weld from the back to preserve the front’s clean lines, then add a small rod or stake so the creature can stand in a pot or border.
3. Functional Pieces: Trellises, Hose Guides, and Hooks
Functional garden art feels especially satisfying because it earns its keep.
A few straightforward builds:
- Trellises: Weld old hoe heads, rakes, and shovel blades to a rectangular frame made from angle iron or rebar. Climbers like peas or sweet peas will weave through the metal and soften it.
- Hose guides: Drive short sections of rebar into the ground and weld a decorative top — like a worn-out trowel or a cluster of nuts — so the hose glides around beds instead of crushing plants.
- Wall hooks: Mount a horizontal steel bar, then weld old wrenches or tines from a rake as hooks for hanging tools or baskets.
Because these items will be tugged, leaned on, and bumped, take your time with welds and test strength before putting them into full use.
Design Tips: From Scrap Pile to Sculpture
Once you understand the basics, the real fun is designing pieces that feel intentional instead of random.
Keep a few design principles in mind:
- Work in Themes: “Birds,” “farm tools,” or “circles and gears” help a piece feel cohesive rather than cluttered.
- Repeat Shapes: Several round elements (washers, saw blades, bearings) or repeated lines (rake tines, spokes) create a rhythm the eyes enjoy.
- Balance Weight: Place heavier items lower and closer to the main support; use lighter, smaller pieces higher up to avoid a top-heavy sculpture that might tip.
Think about how the piece will look from a distance and up close. From across the yard, you want a strong outline; up close, the “Oh, that’s a wrench!” moments give people a reason to lean in.
Finishing and Caring for Your Garden Art
Garden art can be left raw and rusty or sealed for a longer‑lasting finish. Steel exposed to the elements will naturally darken and develop a more uniform rust patina over time, which many people prefer for an organic, weathered look.
If you want to control the finish:
- Clean weld areas and any oily spots with a wire wheel and degreaser.
- For color, use outdoor-rated metal spray paints, focusing on highlights like beaks, eyes, or flower centers.
- To keep a raw-metal look, apply a clear outdoor sealant; this slows rusting but usually doesn’t stop it completely.
Every season or so, walk the garden with a critical eye. Check for loose welds, sharp edges, or pieces that shifted in the wind, and make small repairs. Caring for your creations the way you’d care for plants keeps them safe and enjoyable for years.
Turning broken tools into welded garden art is a quiet rebellion against throwaway culture — and a surprisingly meditative hobby. With basic safety gear, a few simple techniques, and a willingness to experiment, you can transform that forgotten pile of metal into pieces that tell a story every time you step outside.