A Good Video, Ruined by One Small Thing?
Have you ever shot a video that’s okay when you shot it, but then when you play it back, you notice that one little thing you found annoying? Perhaps it’s a watermark in the corner, a date you’ve used before, or some piece of text you didn’t want there.
Great. Just what you needed!
But will you have to go back and record everything? No. Often, a couple edits here and there will solve those small issues-and no, you won’t have to spend hours trying to learn complex editing software.
So, what are your options? Here are a few simple steps to remove watermarks from videos and get rid of annoying objects and make your recordings look sharp before publishing.
Before You Edit, Take a Second Look at Your Video
Preview your video in the editing tool before you begin adjusting. Just play the whole thing from beginning to end.
Here are some common issues to look for:
- Blemishes and signs: Marks of editing of ancient software or a platform covering the video.
- Excluded text: Captions, time stamps, promotion, and/or titles that no longer apply.
- Background distractions: Random objects or people in the frame that cause the viewer’s eye to stray away from the subject.
- Unmatched footage: Variations in video quality, colors, or lighting from clip to clip.
- Unnecessary parts: Lengthy pauses, accidental recording, or footage that does not add any value to the video.
Ask Yourself These Three Questions
- Is anything covering or distracting from the main subject?
- Is there unwanted text or branding that needs to go?
- Does the video look consistent and clear enough to share?
Now, when you figure out what’s the problem, the perfect solution becomes so easy.
Maybe, you just have to delete a timestamp, cut some seconds, brighten up a little. No need to use all those filters and effects, just do simple editing.
When a Watermark Gets in the Way, Clean Up the Original Footage
Found an old video worth sharing, but there’s a watermark sitting right over the best part?
It occurs from past editing jobs, outdated product demos or videos with semi-transparent logos. Some may stay in the corner of the screen while others push into the frame, covering vital information.
You can crop the watermark away, but it can also crop the subject.
Blurring leaves a large, obvious patch, and replacing it with another graphic may not look any better. Moving watermarks is even more time-consuming to do manually.
Removing Watermarks with Vmake Labs
That’s where Vmake Labs video watermark remover comes in for footage that you own or have permission to modify.
The process is simple. Upload your video and choose Watermark from the Auto mode. Vmake Labs will automatically mark the region with AI and get rid of the watermark from the remaining frames. If the auto detection doesn’t catch it, you can pick it manually.
What if the watermark is moving?
Here’s where it gets fun! Vmake Labs can follow moving marks, and it can also derive the covered area from the points around it. This is aimed at reducing flickering, ghost edges, and obvious patches. Though this can get a little tricky with busy backgrounds.
Add single clips, batch the process for multiple videos, and even insert supported links from TikTok, Instagram, and YouTube. Export to HD/4K after all processing is complete.
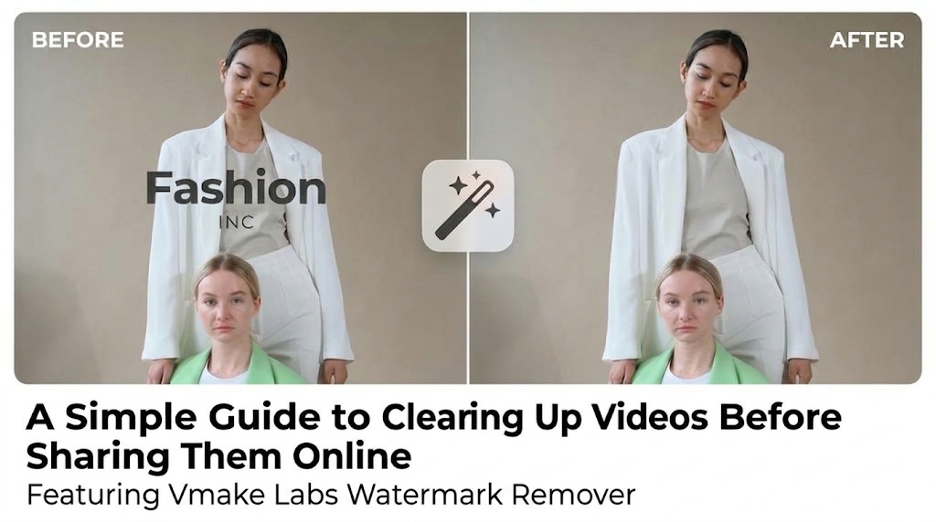
Practical Test: Removing a Watermark from a Lifestyle Video with Vmake Labs (Before vs. After)
Have you ever thought about removing a watermark from a video? Well, you’re going to learn how!
We used a lifestyle video with a visible watermark for this test. Our only wish was to remove the watermark and keep the person and the environment as it was.
We uploaded the clip to Vmake Labs and selected the Subtitle option using Auto mode. The software did its thing and tried to reconstruct the section of the footage that contained the watermark.
Before: The watermark was clearly visible and distracted from the main subject, making the clip look less polished.
After: The processed version was intended to remove the mark while keeping the original framing, colors, and movement intact.
Give Your Videos a Fresh Start by Removing Outdated Text
That old advert message looked good last year. But not now?
You already have captions, date, title, or call-to-action text on your videos that you would love to get rid of. You could be updating an old travel video with a timestamp, reusing a product demo on a new campaign, or translating a tutorial.
Here’s the issue, this text is usually embedded into the video. You can’t just click on it and hit delete.
And for this: Vmake Labs watermark remover offers a browser solution that removes unwanted text without the need to recreate your entire video.
It’s easy to use. Upload an MP4, MOV, or M4V and choose Smart mode to pick up captions, titles, timestamps, and any other visible text. Or choose the Subtitles option if you’re using older captions.
What about text sitting right on someone’s face or a detailed background?
This is where Manual mode comes to the rescue. Select the area to be erased instead of letting the tool auto-detect. Vmake Labs then takes visual cues from surrounding space to fill up the erased section. It can also track the text when it moves on the screen, helping eliminate each frame one-by-one.
With longer projects, you can work on multiple clips at the same time. You’ll also see a preview of the results in your browser before saving it to your computer.
Small Visual Improvements That Make a Video Look More Polished
Good, you’ve removed the unwanted text and watermarks. Now you just need to tweak your video and give it a little polish.
1. Even the Lights
Has this happened to you? You filmed something that was relatively bright while shooting, but the actual footage turned out to be very dark?
Adjust the brightness and exposure to reveal faces and objects. But don’t overdo it! Brightness washes everything out, which isn’t so great. Maintain a consistent level of brightness in all of your clips.
2. Maintain Natural Appearance for Colors
Now no one would want an orange skin or our white shirts turning a blue tinge!
Adjust your white balance if you have it set to a cool or warm tint. Pay attention to saturation, skin tones, and product colors. When you overlay footage, strive to have a steady color match.
3. Stabilize Shaky Footage
A flicker of movement and it comes to life. Too much? That’s a pain.
Use your editor’s stabilization to stabilize your shots. Don’t zoom in too far; it will be very pixelated. You can also remove a shaky shot if needed.
4. Improve the Overall Composition
Is the main subject you wish to emphasize well defined, or are your eyes wandering?
Re-cropping or cropping limited amounts to remove distractions, but not cropping so close as to losing activity or other important info. Keep text and titles far away from the edges, particularly in videos for social media.
A Cleaner Video Is Often Just a Few Edits Away
You don’t require an editing degree to create a visually appealing video. In some cases, all it takes is a tiny bit of work!
Move on to the distracting components. Remove watermarks, erase the previous caption or text, and make a few simple adjustments to colour, lighting, and composition. There’s a solution for each problem, so you don’t need to go overboard on the editing.
It’s quite easy to remove the text and watermark if you own the video or have access to edit the video with Vmake Labs.
Before publishing your video, go back and double-check it.