• Facebook
  • Instagram
  • Pinterest
  • Twitter
  • YouTube

Tools2Tiaras

Take The Wave In Your Gown

  • Home
  • Gift Guide
    • Holiday Gift Guides
    • Shopping
      • Luxury
  • Beauty & Fashion
    • Beauty
    • Fashion
    • Over 40
    • Over 50
  • Family
    • Baby/Toddler
    • Teens
    • College Students
    • Wedding
    • Empty Nest
  • Food
    • Adult Cocktails
    • Baking
    • Entertaining
  • Home & Living
    • Business
    • Crafts & DIY
    • Entertainment
    • Fitness
    • Health
    • Living
    • Movies & TV
      • Movies
    • Outdoors
    • Pets
  • Travel
    • Spa
    • The Compass Girls Magazine
  • Men’s Lifestyle
    • Auto
    • Sports
    • Tech
    • Men’s DIY
    • Men’s Fashion

Renovate your spare room to a nursery

January 14, 2019 Justin Beam 17 Comments

furniture-Collage
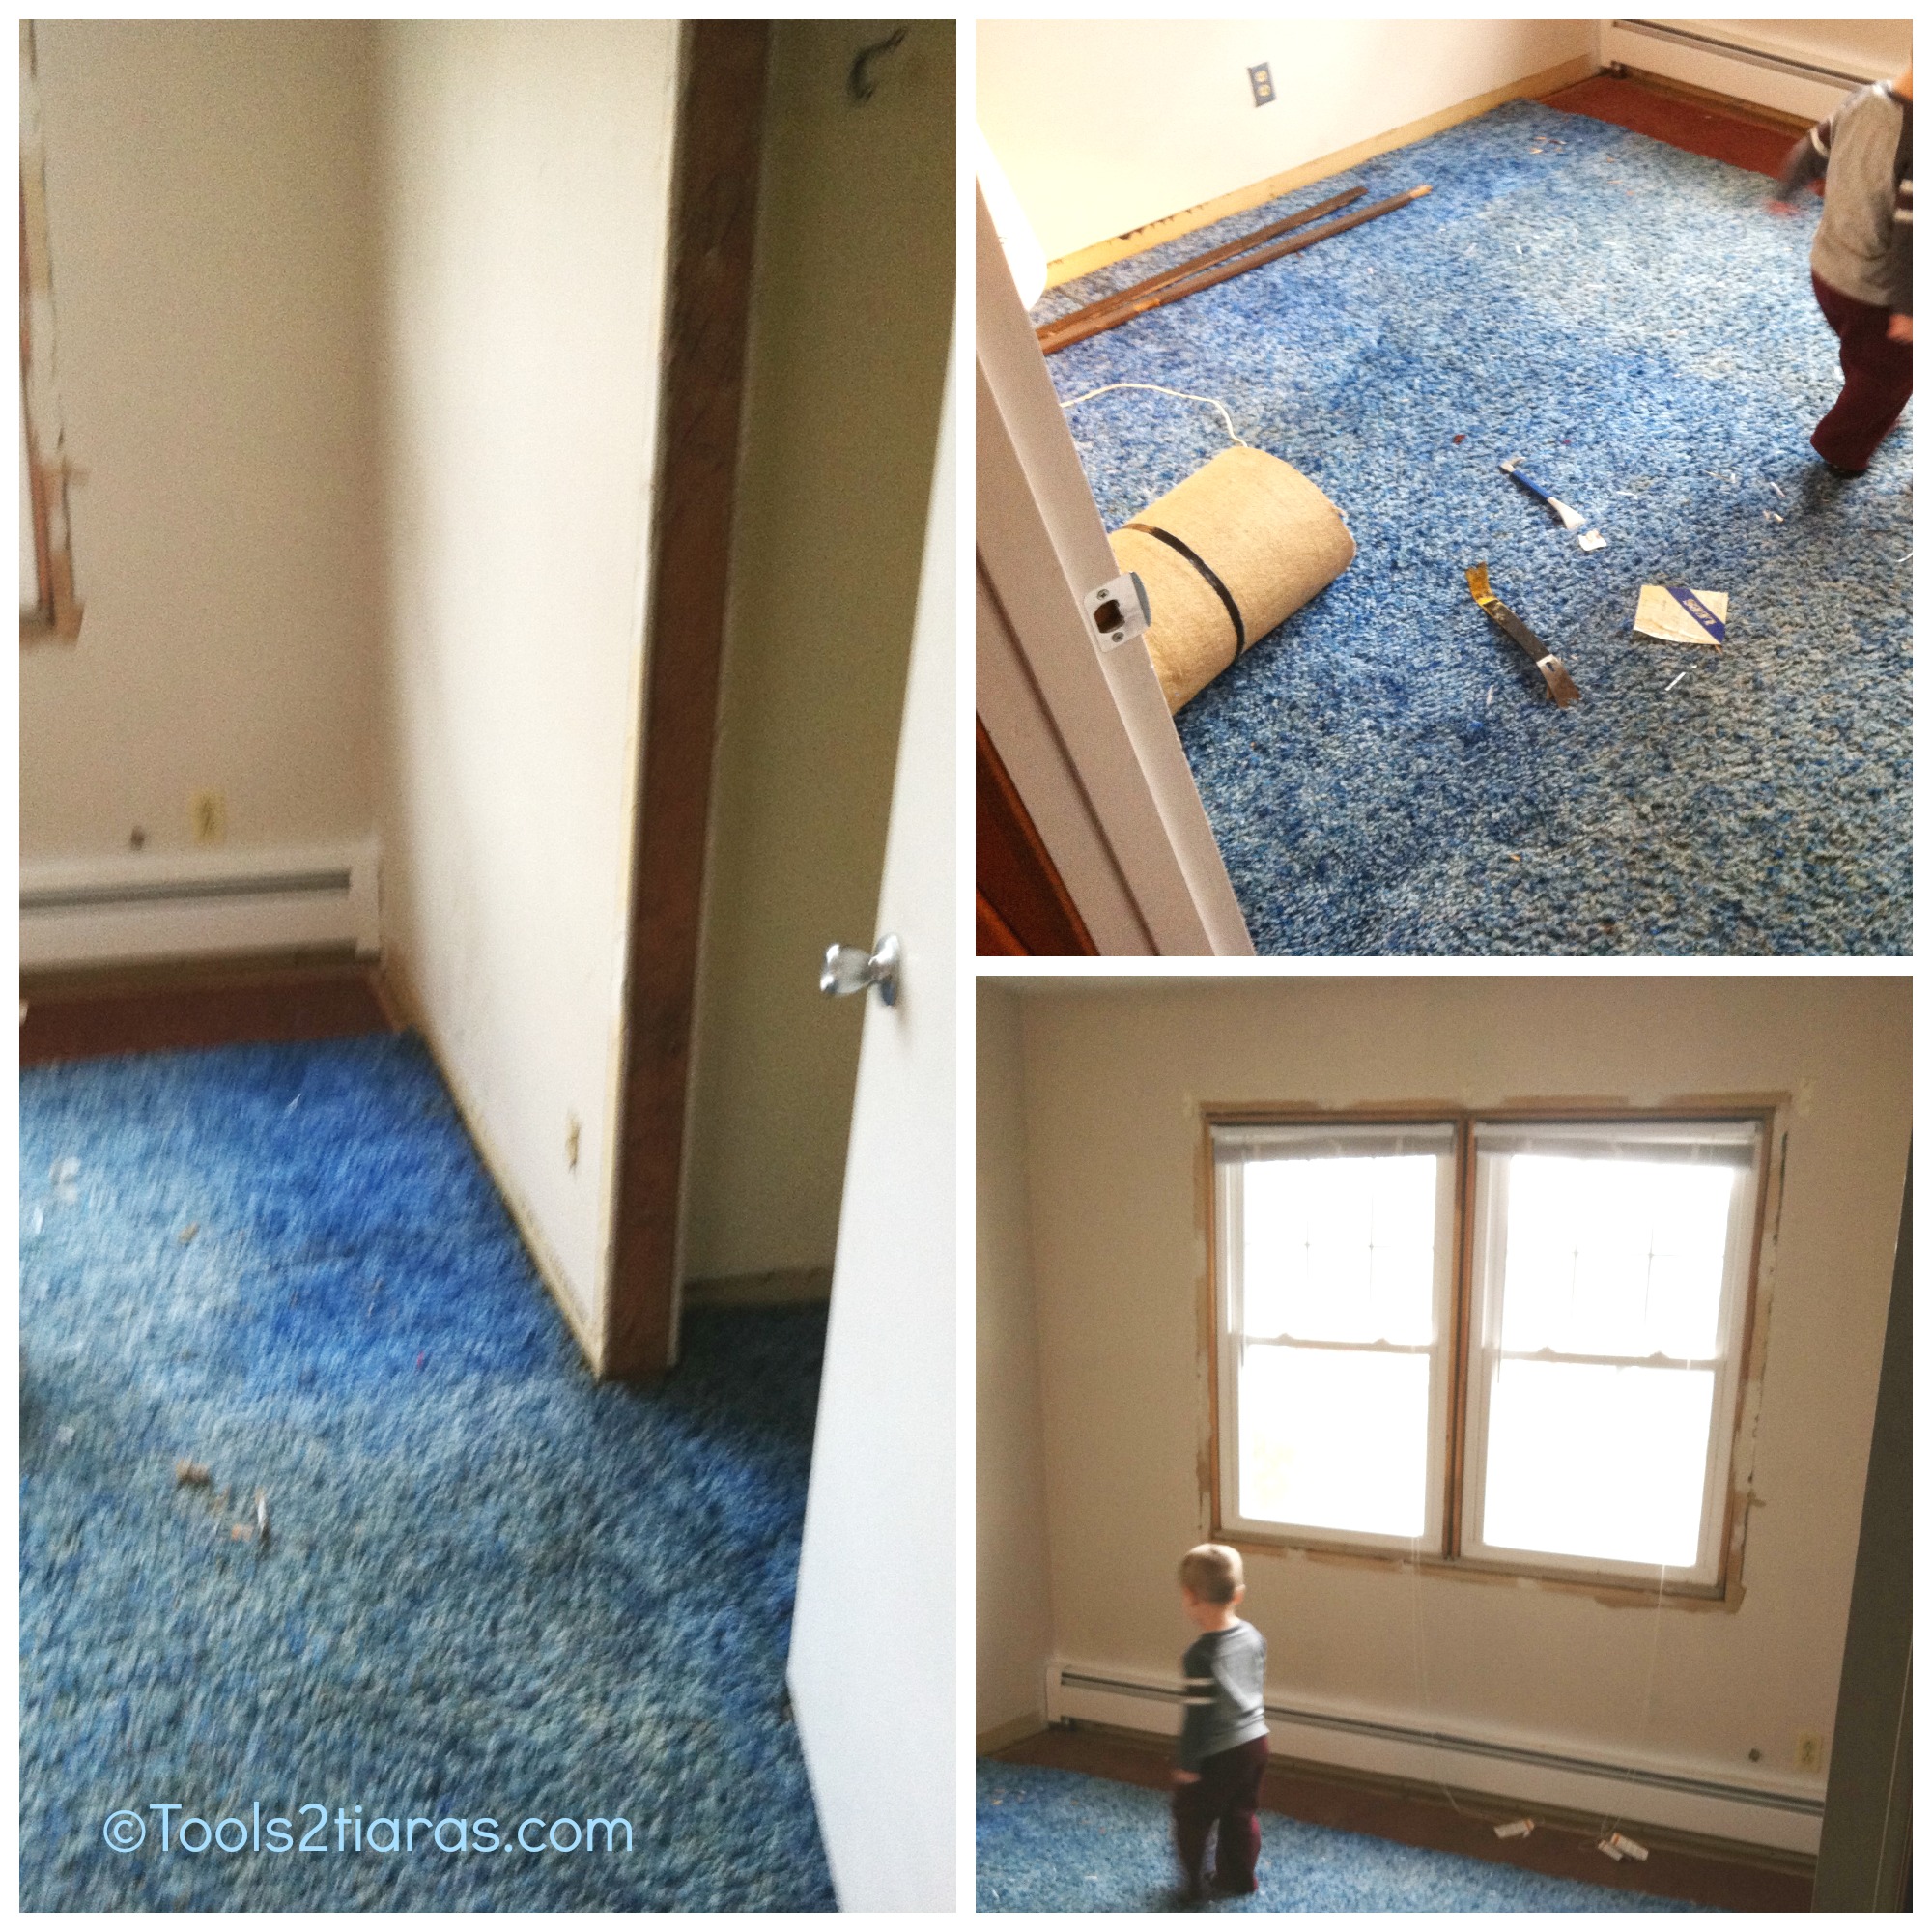
10 months ago we found out  we would be having another baby. Before we would be able to greet our new baby I had to renovate what was going to be his bedroom. When we bought our house 7 years ago it was a fixer upper. The house had not received any updates since the 70’s. You can only imagine the horror that was our reality, shag carpet throughout the house, yellow tile & flower wallpaper (I still have nightmares about it)! I had renovated almost every room except this one because it was just a spare room and was really low on the priority list. Obviously when we found out we would have another child the heat was on to make this room into a suitable nursery.

We began with blue shag carpet and an old hollow door that was stained nearly black to match the rest of the original wood trim in the room. Needless to say it was enough to make you cringe every time you opened the door.  This is how we took it from junk room to nursery.

Old room Collage

Step 1

Demolition: I began by tearing the old carpet out including the old padding.

Step 2

Fix the squeaks: This is an important step if you have an older house like ours. I simply screwed the floor & subfloor into the joists to stop the old nails from squeaking.

Step 3

Remove the old wood trim & door: I used a flat bar to pry the baseboard, door & window trim from the walls. Be careful not to break the sheetrock when you’re prying. Quick Tip: taking an old piece of wood to pry against will disperse the pressure & save you from damaging your sheetrock.

Step 4

Repair any nail holes etc. in the sheetrock and sand the walls to prepare the room for painting.

Step 5

Pick the color & paint!

Step 6

Install new door. Quick Tip: Go with a pre-hung door to make it easier. Make sure to square the door up in the rough opening and shim as necessary. Don’t forget to check that the door jamb is flush with the sheetrock on both sides or your molding will not fit properly. Nail to secure door into opening. Quick Tip: switch out the middle screw in each hinge for a 2 ½ screw. This will ensure that the door is secured to the studs in the opening.

Step 7

Install the jamb for your closet doors. Same as your entry door shim where necessary and nail to secure.

Step 8

Install your pad & carpet. Begin by cutting your pad to size and stapling in place. The carpet is a little trickier but you can do it yourself. Quick Tip: Cut a little larger than your room’s measurements & trim as necessary after you have it in place. I chose to leave my original nail strips to save on my cost but you can replace the old strips with new ones if necessary.

Step 9

Install your trim. I use a Hitachi Miter Saw that can be purchased for about $100. This will allow you to cut your trim to size & cut the necessary angles for your casings. Quick Tip: Cut the angle first then make your straight cut last. Use a finish nail gun like my Porter Cable to save time & make your job much easier.

Step 10

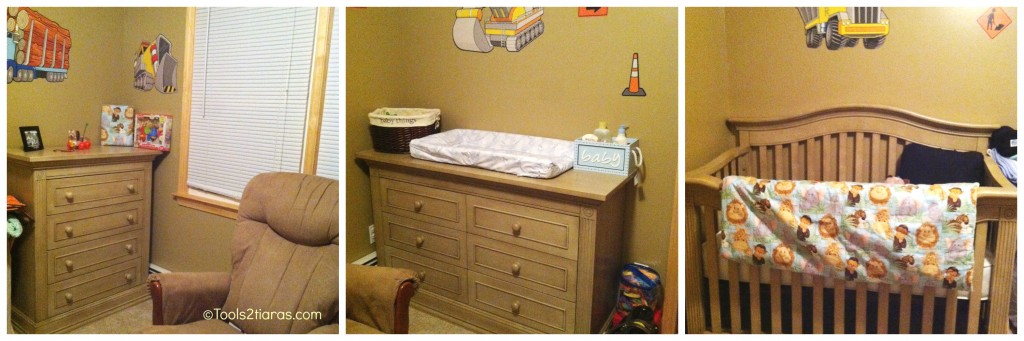
Decorate as desired. We chose to go with construction equipment reusable wall stickers available from Fathead. They are great and don’t force you to commit to a full wall mural.

room done Collage

It seems like a lot of work but if you are pretty handy and have the tools you can definitely handle a project like this!

furniture Collage


What was your biggest DIY project in your home?


Related Posts Plugin for WordPress, Blogger...

Crafts & DIY, Men's DIY carpet, demolition, fixer upper, paint, porter cable, renovate

About Justin Beam

Country born and raised transplanted to the big city. Dedicated husband and father to a mini me. Family comedian, movie fanatic. Corporate sales manager turn social media junkie. Jack of all trades, tool guru addicted to getting dirty in the garage and always looking for a new project. Bazinga!

Comments

  1. Maria says

    January 20, 2014 at 6:37 am

    Great tips!! I think paint, trim and fixtures can make a quick easy fix that makes a HUGE difference to a room. I need to update my closets and add new racks and shelving.

    Reply
    • Rachel Ferrucci says

      January 21, 2014 at 10:13 am

      I agree Maria! I need to renovate my own room 🙂

      Reply
  2. Jeannine Asselin Heavens says

    January 20, 2014 at 7:15 am

    l Great tips. We did our basement and my daughters room.

    Reply
    • Rachel Ferrucci says

      January 21, 2014 at 10:13 am

      I love what you guys did!

      Reply
  3. Jessie says

    January 20, 2014 at 9:28 am

    I’m impressed!!!!

    Biggest DIY project in our home actually involved a pre-hung door. My husband and his dad installed it. We also have that gruesome 70s wallpaper in some areas, but for now that’s pretty far down on the list!

    Reply
    • Rachel Ferrucci says

      January 21, 2014 at 10:17 am

      Thanks Jessie! Pre-hung doors takes so much time off the project so you can do other home projects

      Reply
  4. Jennifer Wagner says

    January 20, 2014 at 10:53 am

    What a great job. Our only DIY projects were painting walls. We weren’t that creative.

    Reply
    • Rachel Ferrucci says

      January 21, 2014 at 10:15 am

      Jen you don’t have to be handy or creative to do a DIY. Just patient!

      Reply
  5. Annie {Stowed Stuff} says

    January 20, 2014 at 11:00 am

    Great post! We had to do this in the past too! Our nursery is tiny, but perfect! http://stowedstuff.com/2010/05/nursery-help.html

    Reply
  6. JenF says

    January 20, 2014 at 11:00 am

    I love the calm, neutral colors that you chose. We have a newer house, so fortunately we haven’t had to tackle any major renovations (YET!)

    Reply
    • Rachel Ferrucci says

      January 21, 2014 at 10:17 am

      Jen all I have to say is LUCKY!

      Reply
  7. Naomi says

    January 20, 2014 at 11:28 am

    That is a huge change! The kids’ bathroom is my big remodel project, the one I’ve been wanting to do for almost a decade… one of these days, it will happen.

    Reply
  8. Jamie says

    January 20, 2014 at 12:45 pm

    Beautiful!! Demo is always so much fun!! I love the colors you chose – those can grow with them. Tweeted!

    Reply
    • Rachel Ferrucci says

      January 21, 2014 at 10:18 am

      Thanks so much Jamie!

      Reply
  9. tara pittman says

    January 20, 2014 at 1:55 pm

    I love doing rooms for babies as they are such fun. Congrats on the new baby!

    Reply
    • Rachel Ferrucci says

      January 21, 2014 at 10:18 am

      Thank you Tara they are fun!

      Reply
  10. Anne says

    January 31, 2014 at 11:41 pm

    We just moved into a new house to give our tween and teen more living space. There is a cool spare room right off our bedroom that would make a perfect nursery. When I mentioned it, my husband looked shocked, LOL.

    Reply

Leave a Reply Cancel reply

Your email address will not be published. Required fields are marked *

Instagram

rachelferrucci


Why did no one warn us that menopause would turn o
Why did no one warn us that menopause would turn our bodies into a crime scene… Dryness. Pain. Sneezing roulette. UTIs showing up uninvited. And doctors smiling politely and saying, “That’s just aging.” Cool. Love that for us.

Say Hello to Silky Peach Cream 🍑 A bioidentical estriol cream that works locally to rebuild thinning tissue, restore moisture, and bring back comfort where it actually matters. Not a Band-Aid. Not a $350 prescription. Not a lube that disappears by lunchtime.

Estriol is the gentlest form of estrogen our bodies naturally make, and Silky Peach Cream puts it back exactly where menopause took it away. Over time, tissue rebuilds, moisture returns, and suddenly intimacy doesn’t feel like sandpaper and regret.

Two pumps nightly. Then maintenance. Because it took years to get this dry… it’s okay if it takes a little time to feel normal again.

I’m done whispering about menopause. I got my life back.  And my peach is happy again!

@parlorgamesfun 

#ParlorGamesPartner #menopause ##over50women  #over50 over50andfabulous


So pretty at first but totally over it! #newenglan
So pretty at first but totally over it! #newengland


I didn’t expect this to be the hardest part of get
I didn’t expect this to be the hardest part of getting older.

If sex hurts. If you avoid intimacy. If you dread wiping.

It’s not “just dryness.” It’s estrogen loss. And yes, it’s fixable.

Menopause doesn’t ease in quietly. It shows up hot, uncomfortable, and disruptive. And for way too long, women are told to whisper about it or accept it as “just aging.” I’m done with that.

Silky Peach Cream helped restore moisture, rebuild thinning tissue, and bring back comfort where menopause took it away. Not a quick fix. Not a Band-Aid. Just real, gradual relief that made me feel like myself again.

Two pumps. Some patience. And a lot less suffering.

Stop whispering about menopause. You deserve relief. You deserve joy. Your peach deserves to be happy again.

Get the details and try it for yourself at the link in my bio.

@parlorgamesfun #ParlorGamesPartner


In paid partnership with #NoPainPact and with the
In paid partnership with #NoPainPact and with the support of #VoicesforNonOpioidChoices. 

When I found out I needed surgery, my 1st thought wasn’t the procedure. It was the fear of being handed opioids again with no real choice. After my last surgery, opioids were the only option I had, my insurance didn’t cover the non-opioid alternatives I specifically asked for. That showed me how quickly exposure can happen. Many people don’t realize that about 1 in 10 patients who receive opioids after surgery will struggle with long-term use. That’s nearly 4 million people per year. It’s no secret that opioids can lead to addiction, & we should be much louder about the fact that there are non opioid options that can be used during surgery to manage pain afterwards. 
Medicare already recognizes this & separately reimburses for FDA-approved non-opioid pain treatments, proving these options are real & available. Yet insurance barriers often make them difficult or impossible to access. Instead of making decisions about my recovery with my doctor, insurance policy made them for me. As I prepare for my next surgery, I want access to every option that reduces my exposure. I know how easily things can escalate. I’ve seen opioid use continue far longer than intended. It can tear apart families before anyone realizes what’s happening. What starts as short-term pain management after surgery becomes something no one ever expected, simply because safer options were never offered. It’s frustrating that some major insurers still haven’t expanded coverage the way Medicare has. #UnitedHealthcare is one of the companies whose restrictions make it harder to access FDA-approved non-opioid surgical pain options. Because of their size, these decisions affect millions. Surgery shouldn’t be a gateway to opioid addiction. Medicare covers these options. UnitedHealthcare & others need to do the same so patients aren’t pushed toward opioids by outdated policies. Patients & families deserve better. 

Tag @UnitedHealthcare so they hear why this matters #NonOpioidsNow #AccessMattersUHC #PatientsOverProfits #OpioidCrisis #RethinkPainRelief #UnitedHealthGroup #healthinsurancefail


Follow on Instagram


© Copyright 2025 Tools 2 Tiaras · All Rights Reserved · · All Logos & Trademark Belongs To Their Respective Owners·

  • Home
  • About Us
  • Contact/PR/Media
  • Privacy Policy
  • Cookie Policy
We use cookies on our website to give you the most relevant experience by remembering your preferences and repeat visits. By clicking “Accept”, you consent to the use of ALL the cookies.
.
SettingsAccept
Privacy & Cookies Policy

Privacy Overview

This website uses cookies to improve your experience while you navigate through the website. Out of these, the cookies that are categorized as necessary are stored on your browser as they are essential for the working of basic functionalities of the website. We also use third-party cookies that help us analyze and understand how you use this website. These cookies will be stored in your browser only with your consent. You also have the option to opt-out of these cookies. But opting out of some of these cookies may affect your browsing experience.
Necessary
Always Enabled
Necessary cookies are absolutely essential for the website to function properly. This category only includes cookies that ensures basic functionalities and security features of the website. These cookies do not store any personal information.
Non-necessary
Any cookies that may not be particularly necessary for the website to function and is used specifically to collect user personal data via analytics, ads, other embedded contents are termed as non-necessary cookies. It is mandatory to procure user consent prior to running these cookies on your website.
SAVE & ACCEPT